Friday 17 February 2012

Rhubarb & Custard Cupcakes


I've never had rhubarb, like proper rhubarb.

Not even in a crumble.

I've had rhubarb and custard sweets before- but that doesn't count.

Either way, i knew i liked it, which is why i was so excited when Lizzie commissioned me to make these as the second batch of cupcakes for her sister's hen do. (Mocha cupcakes being the other batch- see previous post)

I even got to use the jazzy cupcake cases my sister gave me for christmas ^_^

I've never made these cupcakes, and i was following a recipe from my newly acquired Mary Berry book "The Great British Bake Off- How to Bake". So not only this, but i've also never baked cupcakes under Mary Berry's instruction.

I was nervous.

Especially as there was even proper vanilla in the custard i was making. Like the real stuff- out of a pod! I did not want to screw this up.

So basically, if you're wondering about the construction of this deliciousness, it was:

Vanilla sponge, with a rhubarb compote and a homemade custard filling and a vanilla buttercream frosting.

I had to make a few changes to the recipe:

  1. Sainsburys had no rhubarb compote so i used rhubarb filling used for crumbles instead, which worked just as well (i'd imagine! Ha..)
  2. I realised just before baking that i'd need a thermometer to make this fancy buttercream in the recipe which i don't own, so i had to quickly change and opt for a normal vanilla frosting from the Hummingbird Bakery book "Cake Days"... But even with this recipe i changed it. I added the ingredients by eye so that i reached MY desired consistency, as when i made this frosting ages ago, it turned out runny... and i didn't want to risk it with a commission in mind! Btw, turned out fine :P
fresh out the oven- pretty consistently sized :)

Oh! and to make things EVEN better! The timer on my oven decided to break and not even count down -_-"... So i had to just guess, luckily i THINK i was right??! The ones above could probably have been taken out 2-3 mins earlier.

sitting pretty in their fancy cases! (unlike that lovely dirty grill they're sitting on.. apologies, i ran out of space on my cooling rack... which is actually just an upside down utensil tray)


My intention was to get fancy with the frosting, and create that 2-tone pipe on the top. 

Forgetting, obviously, that i fail at piping... Whoops. 

Above is just the vanilla buttercream, one with some pink food colouring.

the "prepared" piping bag


The swirl on the right turned out fine, (reminiscent of a poo) but it used up like HALF of the frosting i made, and that wasn't allowed. So i had to quickly think of something else- i.e. the lovely weird creations on the left.

Don't worry, i wouldn't dare do this on a professional commission but Lizzie was quite willing for me to experiment since i looked like i was on the verge of a nervous breakdown.


They make me giggle a bit- they look pretty crazy!

At least these turned out to look fun.

i finally decided to make more frosting and then just frost the rest of the cupcakes with a palette knife.

But whilst i was doing so, even the slightest hold of the cake, squeezed out some of the rhubarb compote, and the frosting would not stay, it slid everywhere and i wanted to cry.

I soldiered on though and i think they all turned out okay.

A light buttery sponge with a creamy, tart surprise in the middle :) pretty moreish! But i think, after having made 2 batches of cupcakes and no lunch, i was getting impatient towards the end, meaning the quality of the frosting suffered and it was far too sweet, it made my teeth melt!!

Have to remember to stay focused. No matter how much i want to curl up in the oven and cry.

Mocha Cupcakes II


I was commissioned by Lizzie to make 2 types of cupcakes for her sister's hen-do. This being one of the batches! Thankfully it wasn't a proper professional commission so i wasn't under too much stress!

I've made Mocha Cupcakes before and they turned out to be an amazing hit! I just wanted to make these a little different, so i added crushed roasted walnuts, sprinkled on the frosting to really marry up the espresso  and chocolate in the sponge.

I just used the Mocha Cupcake recipe from The Hummingbird Bakery book "Cake Days" and added the walnuts on top. However, i did change the quantities of the ingredients used for the frosting, as this never really turns out right for me, so i did it by eye, texture and taste. It seemed to work a lot better for me.

Obviously, being me, i couldn't make anything without a few hiccups... and thankfully there are many pictures- some quite interesting, and some, not so necessary.

action shot of filling

some cakes getting "tongues" from over filling! whoops!

These ones amused me somewhat :D but they were the nicest ones to frost

Domo lovin' life

my hot chocolate frosting- altered from the original recipe

I think my frosting skills with a palette knife have improved... Obviously still much to be desired but it looks much better than what it used to be!!

having said that, here's a "rustic" lop-sided topped cupcake :P

roasted walnut pieces, waiting to be crushed... which i had to do by hand!! Too poor to own a chopper :(

a painfully badly lit photo. Basically just sprinkled and crowded the nuts on top.

Getting super fancy with the shots.. A bit orange but it looks a bit nicer than that one up there!

Lizzie was very kind and let me have a cupcake from each batch so i could taste and improve for next time. The sponge was light and moist, with just the right amount of frosting. Which, by the way, i think i will always make by my own measurements now, as it always seems to turn out better, consistency wise. 
I don't know if i'm just doing it wrong with the measurements they give me in the book, but i feel it's better to be safe than sorry.
Oh, and the walnuts were a hero decision and they definitely made the cakes look a lot posher :P

Saturday 4 February 2012

Red Velvet Layer Cake


I heart red velvet cakes.

And if you read my blog often, you'd know that i've had several failed attempts. Usually due to the fact that i used an entirely different food colouring (green or orange) so they came out a rather attractive colour suitable for the loo. Mmm..

A very nice grandma of one my housemates (Lizzie), gave me the rest of her Sugarflair red food colouring paste- this was like my holy grail. My passageway into the age of successful red velvet baking.

I couldn't wait to bake this baby.

I used the Red Velvet Layer Cake recipe from Bea's of Bloomsbury's "Tea with Bea" book.

And once again, (i think im making a habit of this) i took many a photo.

This was everything that went into the cake mix. That's homemade buttermilk in the jug on the left there, to be combined with the red wine vinegar and baking powder as the raising agents. And the oil is used for fat instead of butter.

In action... oh you can kinda see me in the handle there- "OH Hi!"

This was when i cut my finger... Ahhhhhhh just kidding. Food colouring paste in :P

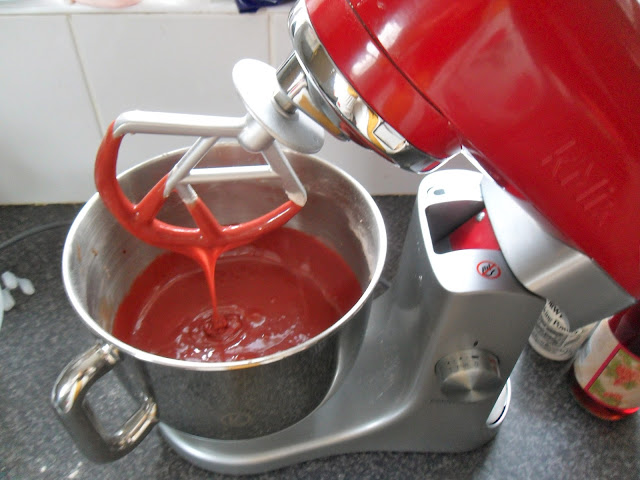
As red as my mixer

Slightly out of focus... cake batter in the tin before baking...

AFTER BAKING!! Giant, bouncy and red.

As I've never really made a layer cake before, the prospect of having to divide this rather shallow cake into 3 layers made me break out in a cold sweat... But i was determined to be brave and to be honest i couldn't talk to anyone while i did it... each slice turned out to be 1cm thick.

one slice down, one more to go...

I think i had to have a nap at this stage... So. Much. Stress.


So i was advised to make this particular cream cheese frosting in this recipe. AND MY GOD. Was it the best advice ever.

Normally, i find cream cheese frostings a little too heavy and actually a little sour.. (no my cheese wasn't off). But this alternative frosting had special additions of mascarpone and whipping cream so it was SUPER light and creamy- it was like eating ACTUAL AIR.

I had to stop myself nomming it all right there and then.

You basically just first whipped the cream to a soft peak consistency before blending the cheeses together with icing sugar and vanilla essence. And then you fold in the cream so that it still has a really light and airy texture. 

Beautiful.

I definitely think i'll be using this cream cheese frosting instead of the one i have been previously.

Sandwiching done

This is the first time i've managed to completely cover a cake in frosting comfortably. I also think it's my best looking one! That doesn't say much about my decorating skills!! haa..

Looking pretty plain..


I had some leftover frosting so i thought i'd get fancy with the piping nozzles.. These were just tests.. Still an amateur afterall T_T

Attempting to get creative..

Finished frosting..

A little wonky- but we'll just call it rustic :P


I'm very happy with how this cake turned out. Definitely a far cry from my poo coloured cakes from back in the day (okay so maybe a few months ago)

The cake was really moist and indulgent. The light cream cheese frosting really complimented the denseness of the cake. 

It was just all round a really enjoyable thing to bake- especially around this time of year! Red for valentines day.. Bleurghgh...

The only thing i would probably have changed would have been to fold the flour in, instead of just blending it in like the recipe said. I don't know if red velvet's are always just meant to be dense, but as i'm a lover of light spongey things, i think i might try and incorporate more air into the mixture so it might turn out taller- and then be easier to slice into layers later!

Close-up of the super red cake. Excuse the large air bubble. I suppose i managed to get SOME air in in the end, eh?

Pretty darn proud :)

Wednesday 1 February 2012

Chicken Pot Pie

This came about as quite a spontaneous thought for dinner yesterday... i've been meaning to make a pie for a while, I want to learn how to make pastry.
But the only thing holding me back was the lack of...

1) a rolling pin
2) baking beans
3) greaseproof paper
4) an actual pie dish.

"Minor details" I told myself.

Now, i know chicken pot pie is so very American but i loved the sound if it- nice cosy chicken and veg in a creamy sauce all in beautiful shortcrust pastry- oh yes, which i totally made myself!

So i did a bit of a rebellion.

I took this loverly recipe for the filling (adding in mushrooms also, looking back i would have opted for some leek too) and then took the shortcrust pastry recipe from Mary Berry's Great British Bake Off book.

Only later did i reach a slight dilemna..

Oh, and my housemate got a bit snap happy with the old camera- so once again, you'll get a horrifically in-depth view of, well, everything..

FIRST, i made the filling, as according to the pastry recipe, the filling should be cold. So i thought, whilst the filling cools- that's when i'd make the case.

Military operation- ingredient preparation

I'll tell you now that i got a bit confused by the filling recipe and ended up boiling my chicken in actual stock. So it had twice the chickeny flavour- amazing!!

Shredding the life out of this chicken breast

veg cooked (lovely steamy sweaty pic)

sauce made by rue method and adding the super chickeny chicken stock, rosemary, thyme and plenty of pepper.

So the pastry begins..

rubbing in the butter- trying to be careful not to warm it up too much..

Wait, are those, breadcrumbs?!!

Err... Yep! ^_^.. Super crumbly and short.

Rolling out the pastry after chilling... Student Stylie

Super proud that it managed to fit and look half-decent. 

Okay, so this is where it got a bit confusing.
Let me try to explain:

So this afternoon i was saying to Lizzie (the housemate) "I can't make a pie because you need to blind bake the base first, I think. And for this, i need greaseproof paper, which i've run out of, and baking beans which i don't have"

What i later found out, is that for Mary Berry's recipe for shortcrust pastry- it doesn't require blind baking at all!! Hooray!!

BUT.

The filling they used in the book looks super thick and hardly liquidy at all- and mine looks quite saucy.
Hence, if i don't do a blind bake, I was scared the pastry wouldn't cook/be horrifically soggy.

And noone, especially Mary Berry, likes a soggy bottom.

So, i came to the decision that i needed to do a blind bake... but with what?!!
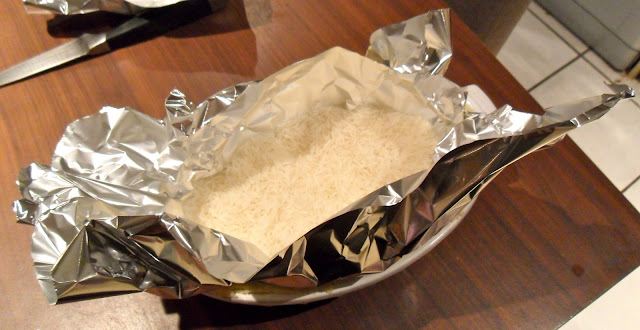
..To cut a long story short, i used foil and rice. Hmm..

Damn student lyfff... 

I'll tell you now, that it did kind of work.
With a little help from Lizzie, We had to lay down the foil on the table, before tipping rice on it and then popping it (carefully) ontop of the pastry, to try and minimise foil stabbage.

Luckily, the pastry was safe and it survived a pretty impressive blind bake, just the bottom looked a little sweaty but besides that, pretty happy.

The only problem was that after my blind bake, I then put the filling in.
And then i put the pie top on.
OH! But what's this?!! The pie dish is hot! O_O
And my pastry pie top is err... melting...

Melting so fast that i couldn't make my pie pretty and crimp it :'((( And that was meant to be the fun part!
I also couldn't take a picture- i had to just shove it in the oven and hope for the soggy best.

To be honest i don't think this looks too bad for my first pie. The edges look black and burnt but i can reassure you it wasn't. Damn lying camera. I swear!

So the pastry shrunk, but the pastry all round was flakey, short and crumbly :)
The base I think, was definitely worth the blind bake, it was stable and crispy. It wasn't as crumbly though, but nonetheless it was edible :)
And that's always a plus.

I had my pie with rosemary and sage mash :) Omernomnom..

And if you're my boyfriend, you mash it all within an inch of its life. My poor poor pastry T_T

I think next time, I'll just do a pastry top and not a pastry case. The filling to pastry ratio was slightly lacking. But overall, a very tasty endeavor.