Thursday 7 February 2013

Carrot & Walnut Cake

Nearly a year later and I still can't cut a bloody cake in half!

Hi there stranger!

Long time no speak! (or type I suppose..)

I haven't actually blogged for nearly a year, completely insane- but I've been in a whirlwind transformation from dirt poor student to a full-time Junior Baker. The hours have been long and brutal and we work long into the night baking artisan breads but it's all amazing experience and has been pretty damn fun.

So yes, I've been pretty run-down with the night shifts, the long hours started to take it out on my back and basically entire body so i felt a bit like an ill-oiled tin man, (still a happy tin man though!) but believe it or not, i've only just got used to it (after 8 months!) so i thought some blogging was in order, now that i can move my arms :D

It's been a while since i've done all this malarkey so you'll have to bear with me whilst i warm up again.

I thought i'd start off with something that was familiar yet unfamiliar ground. 

A cake. A cake I can do. Yes. 

BUT! I've never baked this kinda cake, since I've only just been introduced to the deliciousness that is a traditional carrot cake! I thought I'd add walnuts to this recipe just to add some crunch and texture. I WAS going to put in orange zest into the cream cheese frosting as well for some tang, but the zest I grated kinda turned into juice so that didn't happen. But by all means, if your oranges play ball then zest it up!

The recipe I've created is adapted from The Hummingbird Bakery "Carrot & Ginger Cake". 
(I can now all hear you saying "What?! That sounds way better! Screw this! Get me that Hummingbird book!") Cheers guys.

Oh! and the cream cheese frosting is a recipe from Tea with Bea, it's one that I will forever use, as it's so much lighter than normal american, not too sweet and just the right amount of fluffiness ^_^ I used it before on my last red velvet cake I made (A revision of this cake is yet to come! Well, at least hopefully an improvement).

I'll tell you now, that the cake was pretty amazing. It's even one of those that gets better with age, tastes better the day after you've made it! So if you ever make this for a party, for dinner, or just because you fancy a whole 8 inch cake to yourself, I'd say make the cake the day before, and frost the day you cut it. The cake is incredibly moist and just the right amount of denseness you want from a carrot cake. Sweet and slightly spiced with a smooth and airy cream cheese frosting just to send it on it's way. 

PRITTY DELISH.

Carrot & Walnut Cake

You'll need: 
20cm / 8 inch round deep-fill cake tin (I use one tin for cakes now because I like the even flat layering you get when you cut it)

OR if you find it easier:
2 x 20cm / 8 inch round regular cake tins (you'll just need to half the baking time and switch the tins round halfway through)

- 350g carrot (grated)
- 40ml buttermilk 
- 3 large eggs
- 1 tsp vanilla extract
- 125ml vegetable oil
- 210g caster sugar
- 260g plain flour
- 1 tsp baking powder
- 1 tsp bicarbonate of soda
- 1/2 tsp salt
- 1 tsp cinnamon
- 100g walnuts (chopped) (save some for decoration)

Frosting (from Tea with Bea):
- 250ml whipping cream (very cold)
- 175g mascarpone
- 175g cream cheese
- 2 tsp vanilla extract
- zest of 1 orange (optional)

Here we go!

1) Preheat oven to 170C (325F) and line your cake tin(s) with baking paper.

2) Using an electric mixer or electric hand whisk, mix together the carrots, buttermilk, eggs and vanilla extract, vegetable oil and sugar until well combined.

3) Sift together flour, baking powder, bicarbonate of soda, salt and cinnamon. Slowly beat this into the carrot mixture in 3 additions, making sure to scrape down the sides of the bowl after adding. Stir in most of the chopped walnuts until the batter looks pretty smooth and even.

4) Pour cake batter in tin(s) and bake for about 1 hour 10 mins or until the cake bounces back when lightly pressed. (after the first 30 mins, I covered the top of mine with baking paper to stop the top from catching and browning anymore, you won't need to do this if you are using 2 regular sandwich tins, just remember to bake them for half the time- about 30 mins) 

5) Allow cakes to cool completely on wire rack (or upside-down utensil holder in my case :P) Meanwhile, you can get started on the frosting.

6) Whisk the cold whipping cream until it's reached a stiff peak consistency. In a separate bowl, mix together the rest of the frosting ingredients until well combined.

7) In 3 parts, fold in the whipping cream into the cream cheese mix until evenly distributed. Chill for 15 mins (or for however long it takes for the cake to cool down)

8) WHEN THE CAKE IS COOL. Cut cake in half, (if you used a single cake tin). Sandwich cakes together with frosting and frost the outside (try and use all the frosting, the cake really benefits from it!) Sprinkle with a little cinnamon and the rest of the chopped walnuts.

9) Do celebration dance and pound cake into your face. (MUST REMEMBER!)

I HOPE YOU LIKED IT AS MUCH AS I DID (oops caps)... I totally just shouted at you through my computer...

Wednesday 26 December 2012

Mini Party Cottage Pies


Hi there!

Merry Chrimmy to all! Apologies to everyone for the really orange picture up ahead, it's the only picture we managed to get of the puppies before all 36 were nommed.

The story goes that the cousins gather after christmas (this being boxing day) to have a big old christmas party with lots of drink and food, and to make fairs fair, we all bring a dish or a little something to contribute, made or not.

I decided to make something... And not only that, I wanted to make something DAIRY FREE!
Why? You ask?
One of my cousins is lactose intolerant and I always feel bad that she can't quite punch down as much food as everyone else, so I took advantage of her disadvantage and accepted the challenge. I've also never ever made anything dairy free before.

The mini cottage pies had a dairy free shortcrust pastry shell, filled with all your cottagey goodness of mince, gravy, carrots and peas, and then piped with mash on top (dairy free also!) sprinkled with breadcrumbs and baked in the oven. *drrooooooollll*

These went down an effing STORM!

Ho yes, baby. No one could tell that there wasn't ANY butter in it, infact, it made the whole thing slightly lighter, which meant you could swallow as many as you liked... because it's christmas.

So I'll give you the recipe, but just so you know, the measurements aren't all going to be there as I did most of this by eye...

e.g.
Me: "Does this look like enough potatoes for 36 mini cottage pies?"
Sister: "No."
Me: "Oh."

See? So I suggest you do the same.

And the same with the filling, I basically made a enough for a standard 4 serving cottage pie, and again, I make my cottage pie filling different from, I'm sure, a lot of people. This is just my take on how to make my party cottage pies, extra RAVIN'. I also made it the night before so it was cold enough and had thickened up for filling.

The dairy free pastry recipe I got is from allrecipes.co.uk doubled, it was the only one i could find that was near enough to shortcrust pastry and in metric measures... which helps ya'know?

Mini Cottage Pies
makes approx. 36

You will need: 3 x 12 hole fairy cake pan (or bun pan if you're Northern)

Pastry
- 520g plain flour
- 1 tsp salt
- 170g margarine (chilled)
- 150g vegetable shortening
- 120ml cold water
- 2 eggs

Filling
- tbsp olive oil
- 500g lean beef mince
- 2 cloves of garlic (chopped)
- 1 x onion (chopped)
- 2 x medium carrots (chopped)
- handful of frozen peas
- beef stock cube
- tbsp plain flour
- 1 tbsp tomato puree
- 1 tsp of basil & oregano each
- 2 tsp worcestershire sauce
- dash of cayenne pepper
- salt & pepper

Mashed Tatties
- About 6 or 7 big floury potatoes (maris piper?) (chopped into eighths?)
- soya milk
- margarine
- salt & pepper
- small handful of breadcrumbs

Here We Go!

1) So make your filling the night before: Heat the oil in a pan and saute the onions for about 5 mins until soft. Add the garlic and fry for another minute.

2) Add mince. When it's browned and crumbly, add the tomato puree, dried herbs and crumble in the stock cube. Stir. Add the flour and stir again until thick. Pour over some water until it's all just covered and leave to simmer for about 15 mins. Stir occasionally and add more water if it looks like it needs it. You're aiming for a thick gravy sauce, not runny.

3) Add cayenne pepper, worcestershire sauce, carrots and peas and simmer for a further 5 mins. Season to taste with salt and pepper. Pour the mix into a bowl and leave to cool at room temperature and when cold, put in the fridge until tomorrow.

4) Make the pastry: In a mixing bowl, combine the flour and salt. Cut in the margarine and vegetable shortening until it reaches a breadcrumb-like texture (or rub it together if you're sure you've got very cold hands).

5) Slowly and gradually add the cold water, mixing in until it forms a smooth ball of dough.

6) Form the pastry into a baton shape and wrap tightly in cling film. Put in the fridge for minimum 20 mins.

7) Meanwhile, preheat the oven to 190C and boil water for the potatoes. Once it's boiled, add some salt and add the potatoes to boil for about 15 mins. Once tender and soft, drain and leave to steam dry for a few mins.

8) Put potatoes back in the pan and add some soya milk (maybe about tbsp?) margarine and salt and pepper to taste. Just do everything by eye. If it looks dry, add more milk, if it tastes like it needs more butteriness. add more marg. Leave to cool.

9) Grease your fairy cake pans. Get the pastry out. Dust surface with flour and roll the pastry out to about 3-5mm thick. Now, I used a cup that was just a bit bigger than the hole in my pan, and used it as a cutter. Cut as many as you can out, and as you go along, press the pastry circles gently into the fairy cake pan. (You can use the offcuts, roll them into a ball and press it into the corners and edges to make sure you don't stab anything with your fingernails!) Prick the bases with a fork.

10) Fill each pastry shell level with cold filling. With a piping bag fitted with a large closed star nozzle, pipe the mashed potatoes on a swirl or in rosettes on top (get creative!) and finish with sprinkled breadcrumbs.

11) Put into the oven for about 50 mins, half way through, turn and switch the trays round so they all bake kind of evenly (keep your eye on them to make sure they don't catch. If they look a little brown, cover the tops with baking paper)

12) If you're brave, tip one pie out and make sure the bottom isn't soggy, if it is, put back in the oven for maybe 5 mins more. Put back in the tin and leave them to cool in the tins.

13) If you get impatient and try and ram them into your mouth when they're hot, there is a large risk you'll burn your tongue. Like i did. Careful yeah?!

Enjoy you party people!


Monday 4 June 2012

Ju-bi-lu-beeee

Sorry for not being around.
It was a nightmare for this blog- not because my computer broke or a rabid monkeys stole my keyboard.
No it was worse.

My oven broke.

I know, I know, It was tragic. We were ovenless for a whole 3 weeks. But now we have a BOOOOOTTTIFFUULLL shiny new one :) shame, i've only got another month in this house, I wish i could run away to my new house with this new oven. But anyway.

We recently had a garden party to prematurely celebrate the Queen's Jubilee as well as a kind of celebratory graduate party... So i thought it would be a perfect time to bake some patriotic cakes. However, as I was just putting the finishing touches to my project for uni as well as setting up an exhibition, I had minimal time to be creative and serve up an original recipe, so I baked recipes o ut of a book to save time- however, they were things that I haven't made before :) so it was still very exciting.

I decided to make:

Raspberry Trifle Cupcakes (Cake Days- Hummingbird Bakery Book)
and
Melting Moments (The Great British Bake Off Book- Mary Berry)

I will let you know now that I was so strapped for time and energy that I didn't actually get to buttercream and fill my melting moments, so they were a bit of a challenge to eat (imagine eating a jacob's cracker with no water) but nevertheless, they were definitely melty! But err, yeah next time I should really cream them up. Lazy me.

Oh and kudos to my lovely big sister buying me these union jack cupcake cases :)
They were probably the only things that had me itching to be patriotic (for once) teehee.

Here's some happy pictures documenting the experience:


filling the cupcakes- jam, then raspberry, then CUSTARDDDD, then cake, then MORE CUSTARRRD! (then another raspberry)

photos started to get a bit rubbish now as it started to rain. Typical.

Sad cupcake looks onwards at our wet bunting.


Thursday 10 May 2012

Salted Caramel Shortbread


We're all coming up to that dreaded yet desirable stage of  HAND-IN DAY at uni. Soon our degrees will be over and we'll all be galavanting off and making a mockery of ourselves in the grown- up world of grey skies and office ties.

But until then, I thought I'd rustle up a bit of a pick-me-up, just something to make the journey a little bit more bearable for my lovable housemates (aww, ain't I nice?)

No, no I apparently am not, as i seem to want to attack their thighs and bums with these decadent treats so that I may look skinnier than them all!! Mwuahahaa!!!

Ahem.

Moving on, caramel shortbread or millionaire's shortbread has always been a favourite in the house, but I've started a new resolution. Everything I now bake, recipe or no recipe, has to have a twist of my own in it. Whether or not it's original, I must have thought of it organically from my head. This way, I can offer you some really easy recipes to follow, or you can just stare at the (not so) pretty pictures :)

So yesterday, Caramel Shortbread was on my list. And what goes AH-MAY-ZINGLY with caramel?
Chocolate.

And what goes well with chocolate??
Shortbread.

And what is the soulmate of all these ingredients????!!!!
Well, I'm still trying to work this out. But here's me having a guess.

For this recipe, I added sea salt which gave the treat a real moreish taste and it really enhanced the true flavour of the caramel, and not just for the sweetness, which caramel is obviously renowned for.

I'm a real biscuit fiend, so i made sure the base of shortbread was pretty substantial! I feel that with the other toppings being so sweet, it really helps to have that buttery (biscuit) base to even out the sticky sweet feeling you get when you're teeth are melting.

Either way, you feel way smarter and sophis(ticated) eating these, because of course, THESE ones have salt in!!

Salted Caramel Shortbread


Shortbread

  • 350g plain flour
  • 100g caster sugar
  • 220g butter
Caramel
  • 175ml condensed milk
  • 110g butter
  • 110g brown sugar
  • 2 level tbsps golden syrup
  • 1/2 tsp vanilla extract
  • 1/4 tsp of crushed sea salt
Chocolate
  • 200g plain chocolate (or you can go for milk if you find plain too dark)
You'll need:
  • 8 x 8 x 1 inch baking tin

Here's what to do:
  1. Preheat the oven to 180 C/ gas 4.
  2. Grease your tin and line it with a strip of baking paper so that it hangs over 2 of the edges.
  3. Sift the flour and sugar together into a bowl, add the butter and rub it in, til it forms a fine breadcrumb texture.
  4. (This is where I'm obviously very lazy and have no really method to doing this, but do it this way and it'll still work :P) Pull the dough into a ball. Tear off parts and press into the base of the tin firmly, until the whole base is covered with no cracks or holes. Make sure to get it right to the edges.
  5. Bake for about 15-20 mins or until it start's turning a light golden brown, but still has a very slight softness (it'll harden up as it cools). Remove from the oven and allow to cool.
  6. Once it's cool, start to make the caramel. Put all ingredients for the caramel (APART FROM THE VANILLA) into a thick-bottomed pan. Stir over a low heat until it starts to boil. Cook for about 6-7 mins, stirring to prevent it from burning. If it looks like a golden brown, thick, gooey mix of awesomeness, Bob's your uncle.
  7. Stir in the vanilla and pour over the shortbread base and leave to cool.
  8. Melt the chocolate in a bowl over a pan of simmering water. Pour and spread this over the caramel layer. Sprinkle over some sea salt for luck and leave to cool.
  9. YOU MUST WAIT UNTIL IT'S COOL. Otherwise, you won't have any left for later.
  10. Loosen up the edges of the tray bake with a palette knife. Lift it out using the two over-hanging sides of baking paper. Cut up into bars and scoff until the cows come home.

OMMER NOM NOM!!!

Tuesday 8 May 2012

Mini Raspberry & Lemon Bakewell Tarts


Still on my quest to finding the perfect pensioners party treat, I found a super cute looking tart recipe in "The Great British Bake Off- How To Bake" book. This one being for a mini blueberry bakewell tart recipe. 

They looked perfect! and just enough pretty and not too pretentious. The only problem is that i'm not a huge fan of blueberries, I don't think they really have much taste... Maybe it's just a problem I have :/..
Also, the weather recently has definitely not been optimum for celebratory occasions. So i thought i'd do my own filling, and bring a little sunshine to a very grey and miserable Matlock. (that's where the party was).

I'm all about the raspberries at the moment, and teaming it with lemon really sings out summer and sweetness to me. The result was brilliant, the raspberries were sweet and slightly tart which cut through the sweet almond of the frangipane. And lemon gave the pastry case a zingy, fruity hint.

Even people that were self- proclaimed bakewell tart haters ate more than one! And it was a big hit with the kiddies- so that's gotta be good :)
I'm a bit of a skimper when it comes to decorating, as i usually just wanna stuff them all into my mouth as soon as they come out of the oven... So i'm sure anyone else that follows this recipe can be way more creative!

I wouldn't say this is entirely my recipe as I just adapted my fillings and frills into Mary Berry's recipe. So here it is:

Mini Raspberry & Lemon Bakewell Tarts (makes 12)


Jam

  • 125g raspberries
  • 1 1/2 tbsp caster sugar (add an extra tbsp if you have more of a sweet tooth)
  • A squeeze of lemon juice
Pastry
  • 200g plain flour
  • 100g unsalted butter, chilled
  • 40g icing sugar, sifted
  • 1 large egg, beaten
  • Zest of 1 lemon
Frangipane
  • 55g unsalted butter, softened
  • 55g caster sugar
  • 1 large egg, beaten
  • 40g ground almonds
  • 15g plain flour
  • Zest of 1 lemon
To Decorate
  • 50g icing sugar
  • Dribble of water
  • Drop of pink food colouring
You'll need
  • 1 x 5cm round cutter (I used a cup to cut with, approx. the same size as the base of the holes in the tray)
  • 12 hole muffin tray

Here's what to do:

  1. Preheat the oven to 170 C / gas 3.
  2. Gently heat the ingredients for the jam in a small saucepan. Stir occasionally until the berries lose their watery appearance and the jam becomes thick. Press the jam through a sieve to remove the seeds and leave to cool completely.
  3. Sift the flour into a medium bowl and rub in the chilled butter until it forms a fine breadcrumb texture. (Make sure your hands are never too warm when dealing with pastry, as it will result in a tougher pastry, and it won't be as crumbly). Stir in the sugar, and then using a palette knife, cut in the beaten egg. Press the dough into a ball and wrap in clingfilm. Chill for at least 30 mins.
  4. Roll out the pastry between a sheet of greaseproof paper and the clingfilm until about 3mm thick. Use the cutter or a cup (like i did) to cut out 12 discs and line the bases of the muffin tray. Cut 12  strips of pastry about 1cm wide and 20cm long, and use these to line the sides of the muffin holes, carefully pressing together with the bases so they seam. Chill again for 15 mins.
  5. Beat all the ingredients for the frangipane in a bowl with an electric mixer until smooth and well combined.
  6. Prick the bases of the pastry cases with a fork. Divide the cooled jam among them and top with frangipane. Bake for about 25 mins, or until the frangipane is risen and golden. Cool in the tray for a few minutes, transfer to a cooling rack and leave to cool completely.
  7. Mix up the icing sugar ingredients until it forms a firm yet runny paste, capable of drizzling, and drizzle over the tarts.


Monday 23 April 2012

Rhubarb & Strawberry Crumb Bars

In two weeks time, I've been invited to meet my boyfriend's grandma for the first time at her 90th birthday party...

I'm crapping myself a little bit, since I haven't yet had a chance to meet the extended family! So a good impression is needed, and impressions means gifts- because I can't very well turn up empty handed, can I?

I was going to buy some flowers as a nice gesture, but for some reason the boyfriend is less than partial to the idea...

So the only other thing I can think of is to bake something. Which stresses me out even more, since I'm pretty sure a large majority of all the ladies at this event have done their fair share of baking, and I don't fancy embarrassing myself, trying to impress with the skills that are less than comparable to theirs :(

So, after getting over the initial shock of what I was about to throw myself into, deciding what to bake was the next challenge.

Cake?
A bit too cliche for a birthday party... And i'm pretty sure there'll be cake there.

Biscuits?
They're a bit boring, I don't want to look like a plain jane.

Cookies?
There will be old people, and I'm pretty sure cookies are a little overrated for them.

A traybake.
This is what I've settled on. It's just a matter of finding out which one will last the journey, presentation-wise and texture-wise (since I'll probably want to make it the day before).

So starts the beginning of my short experiment til the event, to find out which effing traybake to make!!!

...Trying to dance this confusion around my final major project for uni is an absolute nightmare.


I opted for a rather attractive looking Rhubarb & Strawberry Crumb Bar tray bake. I found the recipe off of foodgawker. The original recipe is found here. Her's definitely look a lot more palatable than mine, and i forgot to dust mine off with icing sugar -_-' D'oh!!

I think going down the fruit route is better than say, choosing a millionaires shortbread- it's more summery and I think people can eat more of it if it's not too rich.

Anyway, the recipe was pretty standard to follow, the only thing i was unfamiliar with was:
1) cooking with rhubarb, and
2) putting icing sugar into a cake mix

I was actually quite skeptical about using icing sugar in the cake batter, worrying it would be too sweet, but surprisingly, it turned into a very light and bouncy sponge cake! My housemates compared it to the weirdly bouncy sponge cakes you get in the shops that you don't usually get at home. So that's gotta be a plus.

Another thing i was worried about was the size of the rhubarb the recipe said to cut it to (half an inch). I understand that if you undercook rhubarb, it's very stringy and pretty inedible, and putting it raw into the cake.... ughh i dunno.. So attempting to avoid disaster at all costs, I chopped it all into quarters of inches, just to make sure. I don't know whether that was a better idea or not but either way, the rhubarb cooked all the way through and was soft and sweet, and the strawberries gave it a satisfying mush :)

The crumble topping is pretty self-explanatory, except, to the EXTREME. There was a lot of it, and when you pick up a slice, it just falls apart everywhere- it was bloody delicious though, even more so if i'd sprinkled some sugar on top before i baked it, I reckon. But because of the crumble value, I don't think it would make the cut for Grandma's birthday. I have a feeling I'll get there, take off the lid and there's just a apocalypse of crumble and giant red mush.

It was a pretty successful bake otherwise, very tasty, and I reckon it'll be even nicer cold.
It's just a shame it didn't look as nice as the original recipes. How did they get their's so red?!! :( Boo...
Oh, and next time, I'd put the mix into a bigger tin, these slices were pretty tall and mighty.

not the most attractive picture, but just so you can have a look at the squidginess (sp?!)

I'll need to look for something just as fruity, more robust but still as light as these..

The search continues..


Saturday 31 March 2012

Dark Chocolate Tart


So i've been working "really hard" for my final year at uni. And today, me and Lizzie just weren't feeling it.

No work for us today, thanks.

I had an amazing work-free day. Not quite relaxing, but more fulfilling, productive and decadent.

Decadent? I hear you say? Well yes let me explain.

As a thank you for the birthday cupcakes I made for Lizzie's mum, I was taken to Nisbets and treated to some equipment. "SQWEEEEE!!" said I. And i bought a rather attractive palette knife and some baking beans, perfect for the dark chocolate tart I had decided to make later.

After this little trip, we went to a small town nearby called Moseley, and lost ourselves in an extremely cute Delicatessen and were "Ooooooh!"ing and "Ahhh..."ing at all the diverse ingredients. And then we saw these beautiful little Italian pastries in the window. I'm still not quite sure what they were, they were very crispy pastry, filled with different flavours. I chose a lemon and custard and Lizzie opted for a safe chocolate.

They were bloody tasty morsels, I could have had 10 in my mouth if i had the chance.

With our mouths covered in flaky pastry, we glanced across the road to see a cafe bakery, selling fresh bread and even had a garden area. Unfortunately, we were running short on time but promised to go another day :( boohoo..

So we got home, and i got my head down and started following a recipe I'd been meaning to do for a while. Dark chocolate tart from the Primrose Bakery book. And whilst I baked, Lizzie was turning the kitchen upside down for a thorough spring clean. So apologies if you can see some clutter.

I've never made sweet pastry before, so i was trying to be super careful and gentle and make sure my hands were cool at all times.

And i think it's fair to say, it turned out pretty spot on! For a first time, I was pretty thrilled :)

sweet pastry pre-chilling

When I rolled out/ pushed the pastry out, i was quite nervous about the whole thing cracking and disintegrating. I followed the technique advised and just pushed the rolling pin into the pastry to form ridges, turned it round and continued, til it was about the width of a 50p coin.

Getting into the tin was the hardest part, this pastry was seriously prone to cracking. I managed to slide the tin under just in time. But i did have to do some surgical patching up work.

And as i have nails, i pushed the pastry into the sides using a balled up spare bit of pastry. 

Look! you can see my new palette knife! I also brought my rolling pin back from home. No more smirnoff bottles for me!

Using my classy new baking beans ^_^ simple pleasures for simple student

I then patiently waited until my pastry case was all blind-baked. It needed maybe 5 more mins than stated in the recipe, but that's because my oven is very temperamental.

my first sweet pastry blind-baked! i'm quite happy :) minimal shrinkage.

a fuzzy close-up of the edge

Next, was to make the filling. Using copious amounts of Green & Blacks, double cream and butter. O_O"

I only faced one problem when making the filling. After heating the cream, you're meant to add it to the cut up butter and chocolate and stir to melt it.

I hadn't cut up the chocolate properly in preparation (as the book didn't state! but then again i should have known -_-)

So it didn't melt properly so i had to heat it over the steam of some simmering water.

And that's when the whole thing split. The oil was just sat on the top and the bottom was just like curdled chocolate.

I just couldn't come to terms with just loosing 450g of pricey chocolate, so i got out the electric whisk and forced it back together. And thankfully, it worked.

Thank God. Disaster adverted.

Looking pretty shiny- left to set for 2 hours

I then dusted it with cocoa. Forgot to move my sieve to, so i had a massive clump in the middle. WHOOPS!

close-up of the side


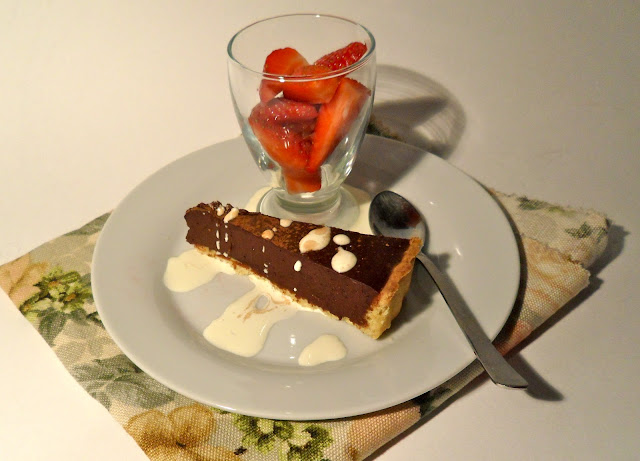
Me and 2 of my housemates shared this after dinner. 

IT WAS SOOO GOOOOOD especially served with leftover double cream and strawberries.

But the title doesn't lie, it was extremely dark.

And the pastry was short and crumbly :) no soggy bottoms here, Mary Berry!

I seem to be a fan of my close-ups.

And that was about it for today, besides painting our nails, watching X-men and having a bubble bath :)

Me having a bubble bath by myself that is.

Also, Hollie my housemate tried her hand at some food styling... The lighting is a little off, as by now it was evening. But either way, she did a much better job than I could ever do!